Building Restful Web Services using Java
When we think of web services the one obvious question comes to our mind is Soap or Restful? And what are the differences and advantages over one another. In this article we are not going to discuss about the pros an cons of them. When we are developing Restful Web Services we need make sure that we support what is expected out of REST Architectural style. That is –
- when we are retrieving a resource we should use HTTP GET.
- when we are creating a resource we should use HTTP POST.
- when we are deleting a resource we should use HTTP DELETE.
- when we are updating a resource we should use HTTP PUT.
We will see how we can develop simple restful web services using Java and Spring Boot. We will implement CRUD operations using restful web services.
Software used
- Java 1.8
- Spring Boot 1.4.7.RELEASE
- Eclipse IDE
As mentioned earlier we are using Spring Boot here so all the necessary code plumbing will be done by it and we will directly concentrate on our code sample. We will go through a sample where we will create, update, get and delete a user from our application system. The pom.xml for reference is as below
|
1 2 3 4 5 6 7 8 9 10 11 12 13 14 15 16 17 18 19 20 21 22 23 24 25 26 27 28 29 30 31 32 33 34 35 36 37 38 39 40 41 42 43 44 45 46 47 48 49 50 |
<?xml version="1.0" encoding="UTF-8"?> <project xmlns="http://maven.apache.org/POM/4.0.0" xmlns:xsi="http://www.w3.org/2001/XMLSchema-instance" xsi:schemaLocation="http://maven.apache.org/POM/4.0.0 http://maven.apache.org/xsd/maven-4.0.0.xsd"> <modelVersion>4.0.0</modelVersion> <groupId>com.opencodez</groupId> <artifactId>restful-demo</artifactId> <version>0.0.1-SNAPSHOT</version> <packaging>jar</packaging> <name>restful-demo</name> <description>Demo project for Spring Boot</description> <parent> <groupId>org.springframework.boot</groupId> <artifactId>spring-boot-starter-parent</artifactId> <version>1.4.7.RELEASE</version> <relativePath/> <!-- lookup parent from repository --> </parent> <properties> <project.build.sourceEncoding>UTF-8</project.build.sourceEncoding> <project.reporting.outputEncoding>UTF-8</project.reporting.outputEncoding> <java.version>1.8</java.version> </properties> <dependencies> <dependency> <groupId>org.springframework.boot</groupId> <artifactId>spring-boot-starter-web</artifactId> </dependency> <dependency> <groupId>org.springframework.boot</groupId> <artifactId>spring-boot-starter-test</artifactId> <scope>test</scope> </dependency> </dependencies> <build> <plugins> <plugin> <groupId>org.springframework.boot</groupId> <artifactId>spring-boot-maven-plugin</artifactId> </plugin> </plugins> </build> </project> |
In this example we are not using any database but will use a static map which serves like our database during our application run. We have written very simple class to help and interact with this map data. This class will be our repository.
|
1 2 3 4 5 6 7 8 9 10 11 12 13 14 15 16 17 18 19 20 21 22 23 24 25 26 27 28 29 30 31 32 33 34 35 36 37 38 39 40 41 42 |
/** * */ package com.opencodez.rest.dao; import java.util.HashMap; import java.util.Map; import org.springframework.stereotype.Repository; import com.opencodez.rest.model.User; /** * @author pavan.solapure * */ @Repository public class UserServiceImpl implements UserService { private Map<String, User> mapOfUser = new HashMap<String, User>(); public void addUser(User u) { mapOfUser.put(u.getId(), u); } public void deleteUser(String id) { mapOfUser.remove(id); } public void updateUser(User u) { mapOfUser.replace(u.getId(), u); } public User getUser(String id) { return mapOfUser.get(id); } public Map<String, User> getMapOfUser() { return mapOfUser; } } |
As you can see we have very simple methods in this class. We will autowire this as our repository and use it in our controllers.
As mentioned earlier we are using Spring Boot for all the underlying configuration. Our main controller is annotated with @RestController that means where every method returns a domain object instead of a view.
Its combined annotation for @Controller and @ResponseBody .
|
1 2 3 4 5 6 7 8 |
@RestController public class MainController { @Autowired private UserService userService; //code here } |
Now we will see one by one each method from our CRUD operation.
Using HTTP GET
In this method we will send complete list of the users available in the system.
|
1 2 3 4 5 |
@RequestMapping(value = "/users/list", method = RequestMethod.GET) public ResponseEntity<List<User>> list() { List<User> users = new ArrayList<User>(userService.getMapOfUser().values()); return new ResponseEntity<List<User>>(users, HttpStatus.OK); } |
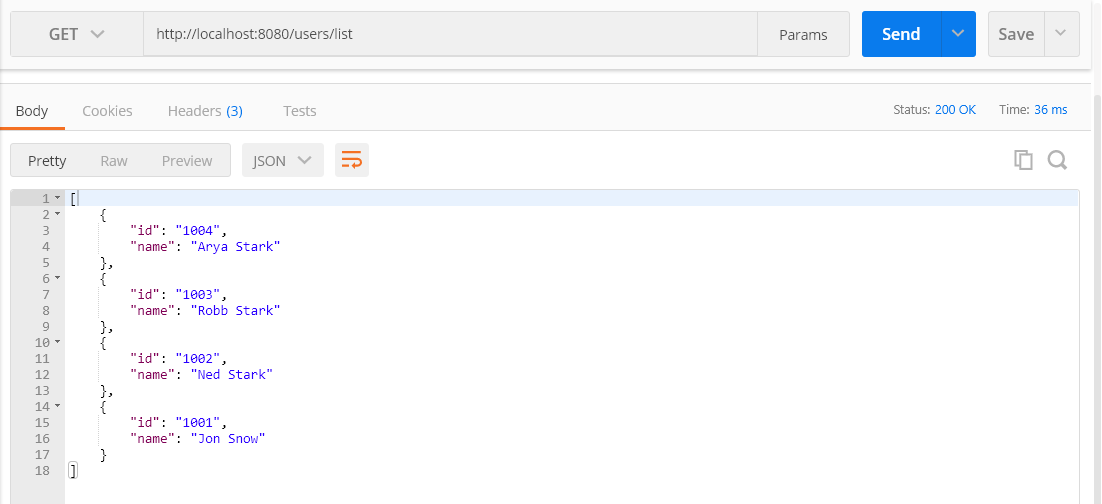
You can see we have restricted the listing to only GET method. The method returns list of users as part of ResponseEntity. When we tested the get call in Postman you can see how we get the list of users as part of our response.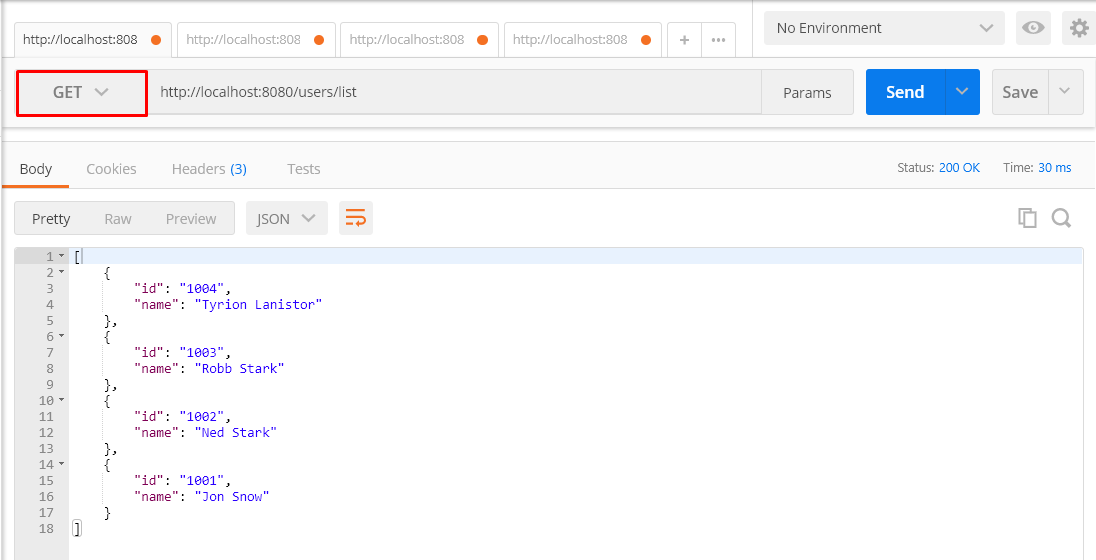
Using HTTP POST
|
1 2 3 4 |
@RequestMapping(value = "/users/add", method = RequestMethod.POST, consumes={MediaType.APPLICATION_JSON_VALUE}) public void addUser(@RequestBody User user) { userService.addUser(user); } |
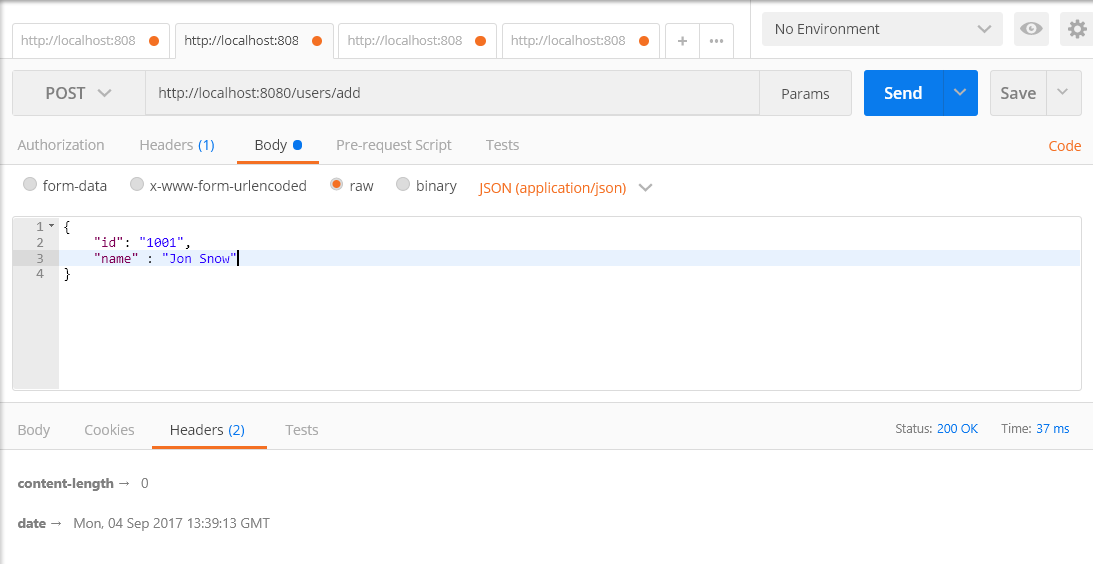
As we are testing from Postman, I have restricted the input to JSON only. Here we are using Springs RequestBody annotation that helps us to map/convert the incoming HTTP request to our User Model. Check below the call we did for adding a resource.
If you use any other then POST method type, it will fail.
Using HTTP PUT
Whenever we are updating any resource we need to use this method type.
|
1 2 3 4 |
@RequestMapping(value = "/users/update", method = RequestMethod.PUT, consumes={MediaType.APPLICATION_JSON_VALUE}) public void updateUser(@RequestBody User user) { userService.updateUser(user); } |
After we updated a resource lets see if it got really changed or not
Using HTTP DELETE
As name suggest, we need to use this whenever we want to remove a resource.
|
1 2 3 4 5 6 7 8 9 |
@RequestMapping(value = "/users/delete/{userid}", method = RequestMethod.DELETE) public ResponseEntity<?> deleteUser(@PathVariable(value = "userid") String userid) { User usr = userService.getUser(userid); if (usr == null) { return new ResponseEntity("User with id " + userid + " not found", HttpStatus.NOT_FOUND); } userService.deleteUser(usr.getId()); return new ResponseEntity<User>(HttpStatus.NO_CONTENT); } |
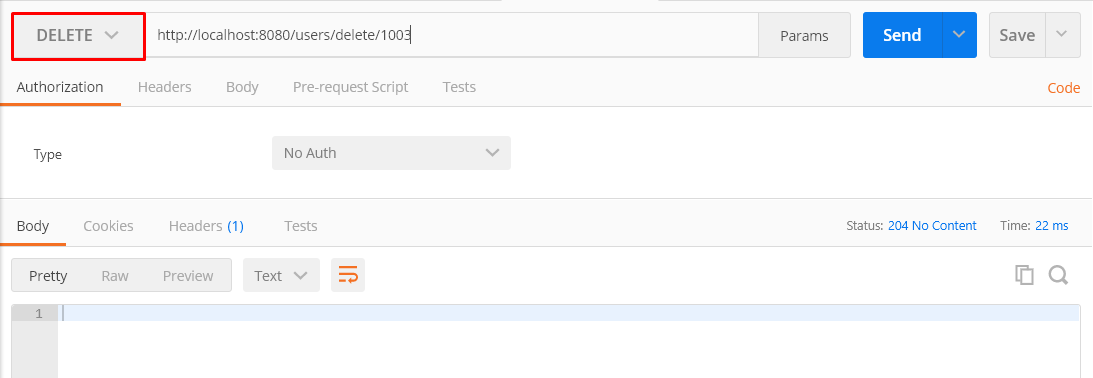
The postman request would be like
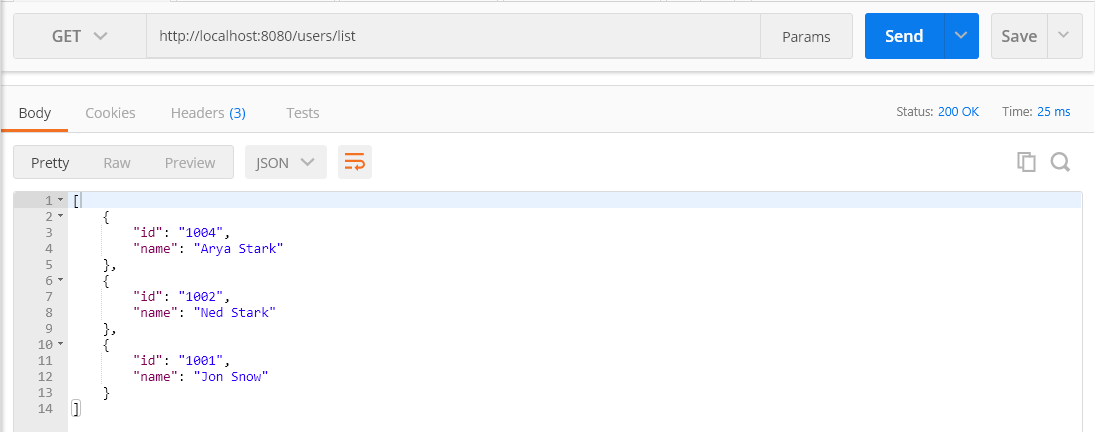
and the list after our api is executed successfully
Thats it. Its looks very easy when we combine Restful with Spring Boot. You can download the code from our Github
Download Code

